Playlist
Show Playlist
Hide Playlist
Clinical Assessment and Evaluation of the Hip

-
Slides Osteopathic Evaluation of the Hip.pdf
-
Download Lecture Overview
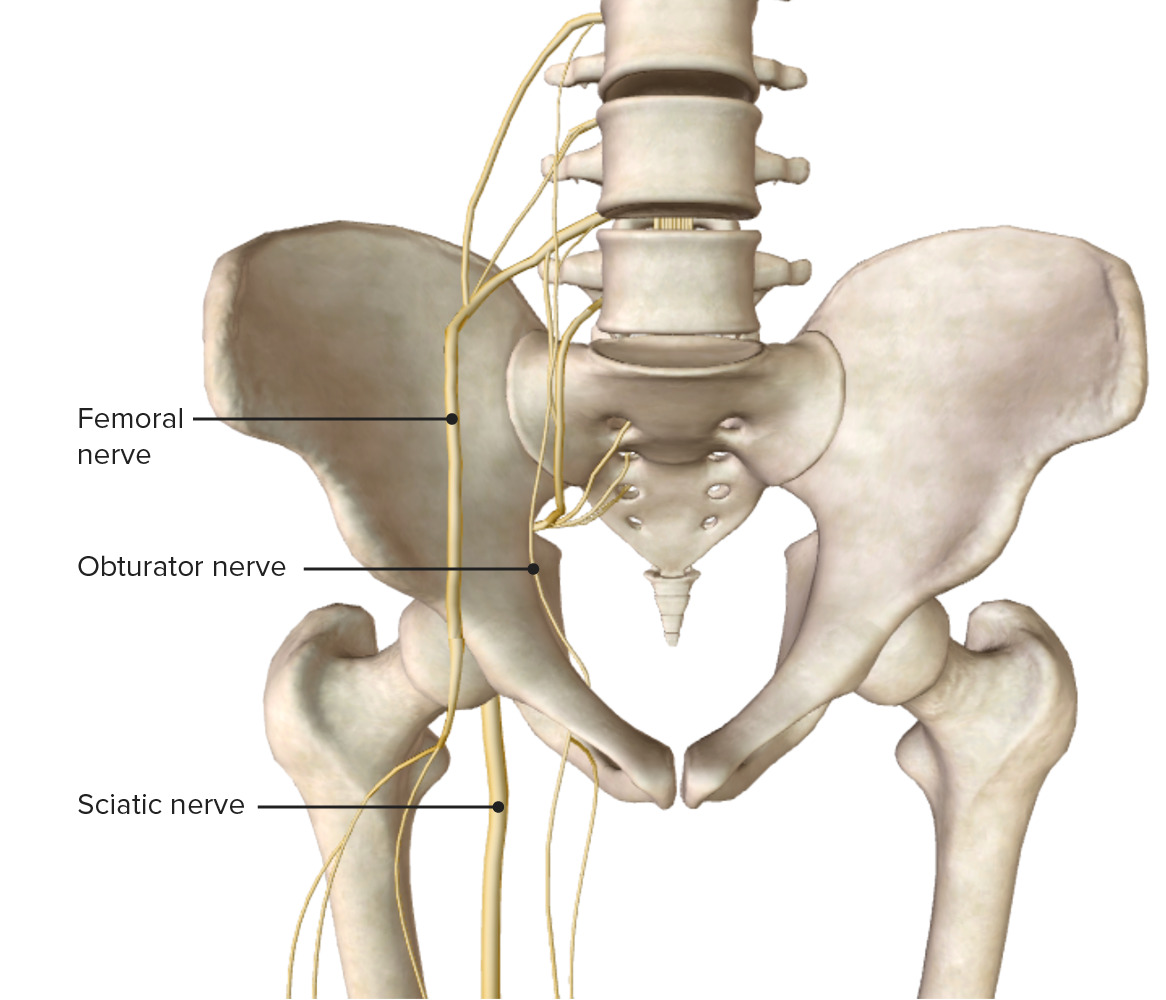
00:01 Clinical Assessment and Evaluation of the Hip. 00:04 So when assessing any sort of hip pathology, we always start with a thorough history and physical exam. 00:10 Within your history, you should discern whether or not the problem is an acute problem or a chronic problem. 00:16 Acute problems might come more from traumas. 00:20 Chronic problems might be problems with degeneration, wear and tear at the hip, and osteoarthritis. 00:27 Based on the patient’s age, you have a different index of suspicion for different hip pathologies. 00:33 Location of the pain will often give you an idea of what sort of hip problem is going on. 00:40 There might be certain timing of the pain whether or not it’s better or worse in the morning or night. 00:45 And then also make sure to review the different medications that patient might be taking for it to try to treat their hip pains. 00:55 With observation of the hip, we want to look at how the patient is standing, how they’re ambulating and walking, and whether or not they have a leg length discrepancy. 01:05 This might be important because if someone has a leg length discrepancy, hey’re going to be placing more of a load on one hip versus the other. 01:13 We want to look at range of motion and assess active and passive range of motion of the hip. 01:19 A loss of range of motion might indicate something going on with the actual joint itself or the muscles surrounding the hip. 01:26 We want to do strength testing with the muscles around the hip and examine the nerves, then utilize any special tests to help narrow a differential. 01:37 And then, performing an osteopathic structural exam cueing us to any possible somatic dysfunction that might be contributing to hip pathology and pain. 01:48 So starting with observation of stance, we want to look at a patient when they’re standing, looking at iliac crest height, making sure that the ASIS and PSIS are level, looking at their lumbar lordosis, and to observe the knees and feet. 02:06 Sometimes patient’s may have flat feet on one side, and again, that might change the strain going up, all the way up into the hip joint. 02:15 Also, look at how they stand and whether or not the hip naturally is more internally or externally rotated on one side than the other and you can tell that by if their toes are pointing more laterally or medially as during their stance phase and whether or not that looks symmetric. 02:33 Through observation of gait, we can look whether or not the patient is ambulating and evenly distributing their weight. 02:39 We can see whether or not they’re in pain or if they’re favoring one side versus the other that might show itself in some sort of limp where they’re trying to prevent putting too much weight on one side or the painful side, and seeing or not they’re ambulating efficiently with their movement. 03:01 Patients with leg length discrepancies may have increased hip pains. 03:05 And so when we’re looking at leg length, we want to check if there’s a true leg length discrepancy meaning that there is a structural shortening or asymmetry of the bones in the leg. 03:18 And so we want to check from one fixed point to another. 03:20 So usually what we do is, you might use a tape measure and measure from the ASIS to the medial malleolus and compare both sides to see if it’s equal. 03:31 The other thing you could do is have the patient lying supine and having them flex their knees so their feet are resting evenly on the table and then you will observe the height of the knees from the side or from the front. 03:47 And if there is a short femur or shortened tibia, you’ll notice that there’s an actual height difference between the knees. 03:58 Leg length discrepancies could also have an apparent discrepancy meaning that there’s a difference in leg length, but it may not be due to a structural problem meaning that the femur or tibias are of normal height, and it’s more of asymmetry and maybe the muscles or the innominate itself. 04:21 So if I have an innominate somatic dysfunction, where the innominate is upsheared or if there’s a posterior to anterior rotation of the innominate, that will change the height or the length of the leg on the apparent side. 04:40 When assessing the hip for muscle strength, what we want to do is to check whether or not the patient could move their hip in different planes of motion against resistance. 04:50 If the patient’s able to move their hip in a specific plane of motion against full resistance, then that would be considered normal or 5 out of 5 in terms of muscle strength. 05:04 And if a patient cannot move at all and there’s no contractility then that’d be a 0. 05:09 So muscle strength itself is graded between 0 to 5, 0 being really no motion or movement when the patient’s instructed to contract and 5 being normal. 05:20 Now the major discerning numbers is between 2 and 3. 05:24 And so, muscle strength of 3 out of 5 means that I could have some range of motion against gravity whereas 2 out of 5 is really being able to move the joint with gravity eliminated. 05:40 So what does that mean? If I’m motion testing someone’s hip abduction and they are able to move against gravity— let’s say I’m checking right hip abduction and I have the patient lying on their left side and then lifting their hip up towards the ceiling, then if they’re able to do it fully then that would be a 3 out of 5. 06:02 But if you ask them to do that and they’re not able to, but then have them lie supine thus eliminating gravity and having them abduct their leg, and they’re able to do it, then that would be a 2 out of 5. 06:14 And so when you’re grading muscle strength, what you want to do is to grade it 0 to 5 and understand that 3 is able to move against gravity whereas 2 is able to move but gravity has been eliminated. 06:34 Neurologic innervation of the hip. 06:37 What we want to do is to make sure that we understand the group of muscles and what is the range of nerves that innervate the hip because sometimes the nerves could become compressed at the lumbar spine due to either lumbar herniations or other sort of compressive pathologies. 06:56 Understanding the different muscle groups and the nerves that innervate it, and if I detect any sort of weakness, what the pathology might be due from, we kind of have to work backwards. 07:07 And so our primary hip flexors are innervated by the femoral nerve which is L1 to L3. 07:15 Our hip extensors are innervated by the inferior gluteal nerve which tends to be more L5 to S2. 07:23 Primary abductors are from the superior gluteal nerve which is L4 to S1 and our primary adductors is from the obturator nerve which is L2 to L4. 07:35 As you can see, there is some overlap and so if there’s only a single nerve compression— let’s say at L5, you might see some weakness in the primary extensors and abductors. 07:47 So it’s important to combine our motor strength testing with further neurologic exam also. 07:57 The hip joint has dermatomes that run from T10 down to S3. 08:02 Although we don’t specifically do sensory testing around the hip, because there’s a lot of overlap in the region, what we tend to do is to do the sensory testing specifically for the lumbar spine and the sacral nerves more by the lower extremity and the feet. 08:17 We do need to be aware of these dermatomes because patients may complain about paresthesia and numbness and tingling along the hip joint itself. 08:26 There is a condition meralgia paresthetica where if there’s too much pressure around the ASIS. 08:33 This might happen with people that have employment where they have to use a heavy belt and there’s a lot of weight around their waist region. 08:44 And that pressure could compress on some of those sensory nerves and so patients can have some numbness and tingling around the hip region. 08:52 So it’s important to be aware of these different dermatomes that wrap around the hip, but the actual doing 2-point discrimination and sensory testing tends to be reserved more for the lower extremity, not at the hip joint itself. 09:09 For the hip, we want to evaluate range of motion, so it’s good to understand the normals of each of the range of motions of the hip. 09:18 Like we said before, the hip being a ball-and-socket joint, allows for motion in all planes of motion but not as much as the shoulder joint itself because there is a very deep acetabulum and there’s a lot of strong connections that limit the overall hip range of motion. 09:38 So in general, your hip flexion goes to about 130°, extension about 20°, abduction ranges between 40° to 60°, for adduction from 30° to 40°, internal rotation goes between 35° to 40° and from 40° to 50° for external rotation. 09:58 These are just general normals for hip range of motion. 10:01 It’s important with patients when testing range of motion to make sure that you check both sides. 10:10 So when performing hip flexion, it’s important to have the range of motion of hip flexion checked with the knee bent because if I check hip flexion with the knee extended, what happens is it limits the amount of hip flexion that could occur because of hamstring tightness. 10:33 For hip extension, you could usually have the patient lying prone and then slowly bringing the hip up into extension, and again, probably around 20° of motion. 10:47 Hip abduction— you’re going to have the patient lie supine, and again, you could bring the leg out laterally to assess for hip abduction. 10:58 And then for hip adduction, what happens is the other leg might be in the way so you may have to bring and flex the leg up just a little bit so it clears the opposite leg. 11:10 And again, adduction to about 30° to 40°. 11:16 Internal and external rotation should be performed with the hip flexed to about 90°. 11:22 This will allow you to assess the amount of internal/external rotation that occurs by looking at how much the ankle could swing medial and laterally. 11:31 So with the hip flexed at 90° and the knee flexed at 90°, if I take the ankle and bring it medially, that would create external rotation of the hip. 11:41 And so the hip joint is externally rotating to about 40° to 50° would be normal. 11:50 Internal rotation—the patient in the same position, flexed to 90° at the hip and at the knees, and now you’re going to bring the ankle out laterally. 11:59 And when you bring the ankle out laterally, what happens is you’re going to internally rotate the hip. 12:06 When diagnosing somatic dysfunction of the hip, what we’re going to do is diagnosis it based on our motion testing. 12:12 And so, if I find any restriction of the hip, we’re going to name the somatic dysfunction for its freedom. 12:19 So we could have 6 different somatic dysfunctions of the hip based on the motion testing that we just discussed. 12:26 We could have a flexed or extended hip somatic dysfunction, internal or external hip somatic dysfunction, or abduction or adduction hip somatic dysfunction. 12:38 So let’s practice with this test question. 12:40 I have a 55-year-old male who comes in with right hip pain for the past 2 weeks which has been getting progressively worse. 12:46 On physical exam, you note that there is external rotation of his right hip to 50° and internal rotation of his right hip to 10°. 12:57 His left hip shows normal range of motion. 13:01 So what is the correct somatic dysfunction diagnosis? So here, our patient could only internally rotate 10° so the right hip is demonstrating an internal rotation restriction. 13:17 Remember, we name the somatic dysfunction for the freedom so we have a right hip external rotation somatic dysfunction.
About the Lecture
The lecture Clinical Assessment and Evaluation of the Hip by Sheldon C. Yao, DO is from the course Osteopathic Diagnosis of the Hip Region. It contains the following chapters:
- Clinical Assessment and Evaluation of the Hip
- Neurologic Examination
Author of lecture Clinical Assessment and Evaluation of the Hip

Sheldon C. Yao, DO
Customer reviews
5,0 of 5 stars
| 5 Stars |
|
5 |
| 4 Stars |
|
0 |
| 3 Stars |
|
0 |
| 2 Stars |
|
0 |
| 1 Star |
|
0 |
